
Sending bottles to daycare for the first time can feel surprisingly stressful. You want every feeding to go smoothly, but you also need to follow the center’s rules, keep milk fresh, and make sure caregivers can identify your baby’s bottles fast. If you are learning how to label baby bottles for daycare, the good news is that the process is simple once you know what information to include and where to place it.
Clear labels help prevent mix-ups, support safe feeding routines, and make busy mornings easier. They also give caregivers the details they need without guessing. This guide will show you exactly how to prepare, label, store, and organize daycare bottles with confidence.
Why Proper Bottle Labeling Matters for Daycare
Proper bottle labeling helps everyone involved in your baby’s care. Daycare teachers often manage several infants at once, and many bottles can look alike when they sit in the same refrigerator. A clear label helps caregivers find the right bottle quickly and follow the correct feeding instructions.
Most centers also have an infant care policy that requires baby bottle name labels, date and time labeling, and milk type details. These rules support safe storage for breast milk and formula bottles. Good labeling also helps you feel more organized at drop-off, especially during rushed mornings. When your bottles are easy to read, caregivers can focus more on feeding, soothing, and caring for your baby.
Tools and Materials You’ll Need
Start with the daycare’s labeling policy, since each center may have its own rules for names, dates, bottle contents, and cap labels. You will also need waterproof daycare labels or a simple roll of masking tape if your center allows temporary labels. A permanent marker with dark, quick-drying ink helps keep writing clear through handling and refrigeration.
If your bottles have removable caps, collars, or silicone sleeves, check whether those parts need labels too. Use storage containers or a bottle tote to keep prepared bottles upright during transport. For extra convenience, you can keep a small labeling station near your bottle prep area with labels, marker, and cleaning cloth in one place.
8 Step-by-Step Guide on How to Label Baby Bottles for Daycare
Step 1 – Check Your Daycare’s Labeling Rules
Before you write on anything, read your daycare’s infant care policy or ask the director for bottle requirements. Some centers want the baby’s full name on every bottle and cap, while others allow first name and last initial. Many also require the date, milk type, and preparation time.
The first rule of how to label baby bottles for daycare is to follow your center’s system before creating your own. Picture the daycare refrigerator during a busy morning: rows of bottles, similar caps, and caregivers moving quickly. A label that matches their process helps them work safely and efficiently. If a rule feels unclear, ask before your first drop-off.
Step 2 – Choose the Best Label Type
Next, decide whether you want reusable waterproof labels, write-on labels, masking tape, or bottle bands. Waterproof labels work well if your bottles go through daily washing and refrigeration. They usually feel smooth, stick firmly, and stay readable after repeated handling.
Masking tape can work for dates and temporary notes, but it may peel when damp or cold. Bottle bands are helpful for names because they wrap around the bottle and are easy to spot. If your baby drinks both breast milk and formula, consider using different label colors for each type. Choose a method that fits your budget, your daycare’s rules, and your morning routine.
Step 3 – Clean and Dry Each Bottle First
Labels stick best to clean, dry surfaces. Wash bottles, caps, nipples, and collars according to the manufacturer’s instructions, then let them dry fully before labeling. Even a thin layer of moisture can make adhesive curl at the edges.
Run your fingers over the bottle before applying a label. It should feel dry, smooth, and free of milk residue or soap film. If you use glass bottles, avoid placing labels on curved areas where they may lift. If you use plastic bottles, pick a flat spot away from measurement marks so you can still see ounces clearly. A clean surface makes your daycare bottle labels last longer.
Step 4 – Decide What Information to Include
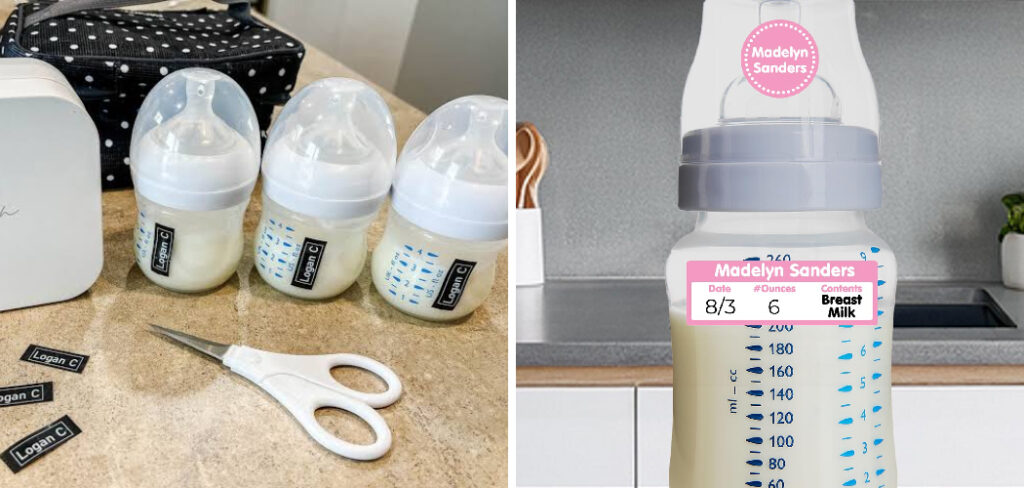
Most daycare centers want your baby’s name, the date, and the type of milk. For breast milk storage labels, you may also need the pumping date, thaw date, or time the bottle was prepared. For formula bottles, your center may ask when the formula was mixed.
Keep the information short but complete. For example, “Emma R., 5/29, breast milk, 9:00 a.m.” gives a caregiver the key details at a glance. If your baby has special feeding instructions, such as “warm only slightly” or “offer 4 ounces first,” ask whether those notes should go on the bottle or a separate daily sheet. Clear details reduce confusion.
Step 5 – Place Labels Where Caregivers Can See Them
Place the main label on the body of the bottle where it is easy to read from the front. Avoid the bottom, since caregivers should not have to lift every bottle to check the name. Also avoid covering ounce markings, safety warnings, or venting parts.
If your daycare asks you to label caps, add a smaller name label there too. Caps can separate from bottles during warming, storage, or cleaning, so this small step prevents mix-ups. Press each label down firmly and smooth it from the center outward. You should feel it seal against the bottle without bubbles, loose corners, or wrinkled edges.
Step 6 – Add Dates, Times, and Milk Details Clearly
Date and time labeling matters because breast milk and formula have different storage rules. Write the date large enough for a tired adult to read quickly. Use a permanent marker that does not smear when your hand brushes over it.
If you are using fresh breast milk, thawed breast milk, or formula, say so clearly. Do not rely on memory or bottle color alone. This is where how to label baby bottles for daycare becomes part of safe feeding, not just organization. A caregiver should be able to open the refrigerator, read the label, and know exactly which bottle to use first. Simple wording works best.
Step 7 – Store Bottles Upright and Ready for Drop-Off
Once the bottles are labeled, place them upright in the refrigerator or an insulated bottle bag. Keep caps tight, and make sure labels face outward if you store several bottles together. This makes your morning check faster and helps you spot missing information.
Use a clean storage container if your daycare wants bottles grouped together. The container can also hold extra nipples, caps, or written feeding instructions if allowed. During transport, keep bottles cold with an ice pack when needed. At drop-off, hand them to the caregiver or place them in the assigned refrigerator area. A neat bottle organization system makes the whole handoff calmer.
Step 8 – Build a Repeatable Bottle Prep Routine
Create a simple routine you can repeat every night or morning. Wash bottles, prepare milk according to safe guidelines, label each bottle, check the daycare drop-off checklist, and place everything in the fridge or bag. Doing the steps in the same order helps you avoid last-minute mistakes.
Once you know how to label baby bottles for daycare, the goal is consistency. Keep your labels, marker, and bottle tote in the same spot so you do not search for supplies while holding a baby. Before leaving home, do one final check with your eyes and hands: name, date, milk type, cap, and cold storage. That small habit saves stress.
Common Mistakes When Labeling Baby Bottles for Daycare
One common mistake is using labels that cannot handle moisture. Regular paper stickers may look fine at home, but they can wrinkle, peel, or smear in a daycare refrigerator. Choose waterproof labels or approved temporary tape that stays readable through the day.
Another mistake is writing only your baby’s first name. In an infant room, two babies may share the same name or a similar bottle style. Add a last initial or full last name if the center allows it.
Many parents also forget to label caps and removable parts. Caps can get separated during warming or storage, so matching them to the right bottle matters.
A final mistake is adding too much information in tiny writing. Caregivers need quick, clear details, not a crowded label. Put the most important items first: name, date, time, and milk type. If feeding instructions are longer, use the daycare’s daily form.
Expert Tips
Prepare labels before you are tired, rushed, or packing for drop-off. Many parents find it easier to label empty clean bottles first, then add milk details on a temporary date label after filling. This keeps permanent name labels neat while still giving caregivers fresh information.
Use high contrast whenever possible. Dark ink on a white or light label is easier to read than pale ink on a patterned sticker. Keep a backup marker in your diaper bag or car for quick fixes. If your baby’s feeding plan changes, update labels and written instructions the same day. Small systems make daycare mornings smoother and help caregivers follow your preferences with less guesswork.
Frequently Asked Questions
What information should I put on daycare bottle labels?
Most daycare bottle labels should include your baby’s name, the date, and the milk type. Many centers also want the preparation time or pumping date, especially for breast milk. If your baby has feeding limits, allergies, or warming preferences, ask whether those details belong on the bottle or on a separate daily care sheet.
Can I use masking tape to label baby bottles?
You can use masking tape if your daycare allows it, but it works best as a short-term option. It may peel or smear when bottles get cold, wet, or handled often. If you use it, write with a permanent marker and replace it daily. Waterproof labels are usually more reliable for names and repeated washing.
Do I need to label bottle caps too?
Many daycares ask parents to label caps because caps can separate from bottles during storage, warming, or cleaning. Even if your center does not require it, adding a small name label can prevent confusion. This is especially helpful if several babies use the same bottle brand, color, or size in the infant room.
Should breast milk and formula bottles be labeled differently?
Yes, it helps to label them clearly because breast milk and formula have different handling and storage needs. Write “breast milk,” “thawed breast milk,” or “formula” where caregivers can see it. You can also use color-coded labels if your daycare permits them. Clear milk details help staff follow safe feeding routines and use bottles in the right order.
How often should I replace daycare bottle labels?
Replace temporary date labels every day, since dates and times change with each feeding batch. Permanent name labels can stay on as long as they remain secure and readable. Check them after washing and before drop-off. If corners lift, ink fades, or the label becomes hard to read, replace it before sending the bottle back to daycare.
Conclusion
Labeling daycare bottles is a small task with a big impact. Clear names, dates, milk details, and feeding notes help caregivers work quickly and safely. They also help you feel more prepared when mornings are busy and your baby needs a smooth handoff.
Start by checking your center’s policy, then choose labels that can handle moisture, cold storage, and daily use. Clean each bottle before labeling, write only the details caregivers need, and place labels where they are easy to see. A repeatable bottle prep routine will help you avoid forgotten dates, missing caps, or unclear instructions.
Learning how to label baby bottles for daycare gives you one less thing to worry about during the transition into childcare. With the right supplies and a simple system, you can send each bottle with confidence and support a safer, calmer feeding routine for your baby.

About
Joann Meril didn’t plan on becoming a parenting writer — it found her. After spending several years working as a certified nursing assistant in a pediatric clinic, Joann saw firsthand how anxious and under-informed new parents could feel, even with a hospital full of resources around them. When she had her own two children, that gap became personal. Suddenly she was the one googling things at 2 a.m., comparing baby monitors, and wondering if the swaddle she bought was actually safe.
That experience is what shaped her approach to writing. Joann believes parenting advice should be practical, honest, and free of unnecessary jargon or guilt. She tests products herself whenever possible, reads the actual safety standards instead of just the marketing copy, and isn’t afraid to say when something isn’t worth the money.
Today, Joann writes full-time, covering everything from newborn sleep routines to gear reviews to the small everyday wins that make parenting feel a little less overwhelming. When she’s not researching or writing, she’s usually chasing her own kids around the backyard or drinking coffee that’s gone cold for the third time that morning.
Joann lives in [City/State] with her husband and two children.
Credibility
- Background in pediatric caregiving (CNA)
- Mom of two, hands-on parenting experience
- Hand-tests baby gear before recommending it
- Focus: infant sleep, feeding, gear safety, early development